This past weekend at the Barony Beyond the Mountain and Bergental Yule celebration, an Arts and Science display was held among the many other activities that were happening. I was unable to make it to St. Eligius with my project so this was to be its debut. Ástríðr Sægeirsdottir and I arrived and were presented with a space to set up our displays. She was displaying a small silver spice spoon which she had made for me as an anniversary gift.
I barely had the bucket unpacked when the first questions began rolling in. I would continue to set up my display while talking about the project as a whole. I will admit that while I had an idea of how I might set things out, the first few questions really helped me place items out upon the table. An early question was about the designs and repoussé work, so those tools and samples gained a prominent place in the display. The extra wood bits and sample staves helped me illustrate grain direction and some other choices. The books I brought allowed me to show other samples, tools, and helped describe other aspects of the project itself. Of course, I forgot to snap a photo of the display while I was there, so the above photo was recreated the next day at home.
I met some wonderful people that day and was filled with so much encouragement at every corner. We talked about culture, construction, cræft, and despite my nerves and shyness, I had the most wonderful time. One woman even proudly brought back over her utility bucket made by a master cooper within the SCA, so that I could see it and perhaps gain some insight. (It had the most wonderful chamfer on the bottom cutting up to the base.)
I could not have done this with out the encouragement and love from Ástríðr and to her, I am forever thankful. I left there with a list of questions, suggestions and ideas to further this project along. I would like to make a sample split pin rivet and gather some samples of yew and natural dried pine for example. I was also asked if I had thought about either Kings and Queens A&S champs or Artifacts of a Life. The truth is that I had, but not so much as to have made a decision. On the drive home I listened to a great podcast called Cut the Craft. This episode featured the wonderful, Roy Underhill.
The work we did early in our evolution with the materials of nature shaped us – as we shaped it.
Roy Underhill
To see the project in person, I guess you’ll just have to come visit me at the event, Artifacts of a Life.
While it looks to be just a piece of scrap wood, this simple bit of pine is actually a proof of concept. Measuring in at about 1.5 x 8 in, it helped show me that some of my process is solid while others need some work.
One item that worked well includes the cleaning and sharpening of an antique wood plane. The jointer is about 22 inches in length and while it still needs a bit of help, but for now it will do what is needed.
I also found a piece of common 2×4 with very straight grain running along the length. Using a splitting knife, I was able to rive a fairly even thickness after an initial piece was split from the face.
With the jointer mounted in my bench-vise blade up, I was able to then shave the sides on an angle with ease. I will have to research if the rings should be inside or outside.
What I need now is a way to hold this piece so I can take a draw knife to it and shape the wide edges. While I will build a shave horse someday, this piece is small, so a bench mounted version is being built. I also want to make a small jig set to 30°, so that I can measure the edges after I shave them on the plane.
Lastly, I need to sharpen my curved draw knife so it will take a cleaner slice. I am pretty sure a plastic spoon might do a better job at the moment. All kidding aside, I now wonder if my spoon knife might work well to make the hollow on the belly since it is so small.
Like many, my SCA journey has been a bit quiet for the past couple years. I have tried to work on many projects but I can never seem to keep up. Work has taken some twists and turns, and at the end of the long days, the couch, TV, or a nap feel needed before the start of the next cycle.
Three in the mustard, two in the ketchup.
Over the pandemic, I moved away from archery and into thrown weapons. The weekly(ish) practice is much closer and more attainable. Overall, I am improving and this weekend I threw an incredible 21 with knives at short range. I did focus on a couple of new techniques that helped me hit true but in the end I know luck was on my side. We will see if these skill stick onto the next practice.
Now I need to shift some focus. The arts and science event, St Eligius is approaching and I would like to enter with a project I have had in mind. If I can plug away a little each day I should be in ok shape. Much of the initial research is done on both history and technique and now it is time to put it to practice. I have longed to make Craft as a Daily Practice [see Mortise and Tennon Podcast, Episode 29] and now is that time to get going.
This morning I was able to clean off my workbench and began to restore a wooden jointer I bought from an antique shop over the summer. While I don’t have the time for a complete restoration, if I can get the blade sharp and belly clean, that will go along way to helping with the plan.
I will try to use this blog to help me finish this project on time and to the best of my skill so stay tuned. In the meantime, let me know in the comments how you ‘Stay on Target’ and keep up with your projects.
Pennsic is upon us and due to ‘surprise’ circumstances, Ástríðr and I found ourselves not able to attend. Fortunately we do have many amazing friends sharing their time and experiences so we may enjoy vicariously through their written word and photos. Back on day 4 (July 29 for those counting,) Baroness Deirdre wrote on her blog: “I’m really wishing that I had made some tokens to hand out prior to coming to War.” Day 5 – the wheels were in motion.
I had only carved and cast soapstone once before so yeah, piece of cake right? To make a long story short, I carved the square token for the Baroness, breaking off two of the pins that would make up the holes on the first attempt. I decided I would have time to also make one for Baron Keziah and after reviewing her heraldry, threw that to the curb and decided she needed a windmill, (someday we will make one but this would have to do for now.)
Cutting the soapstone, Laying out the designs and remembering to reverse them, and the final molds – prior to bits breaking out.
In carving the windmill, I thought that I should carve the ‘building’, and then carve the blades as they would be deeper but – after starting again – I carved the blades first, and then the building which worked much better.
When it came time to cast, the ‘holes’ of the tablet quickly broke off but not so bad that the design didn’t work. The Windmill lost a small chunk under the top left blade as well. While casting 20 for Deirdre and 10 for Keziah, Ástríðr helped file and clean the casts. We handed them off to a good friend who transported them and surprised the recipients.
In the end I am very happy with them as I know Baroness Deirdre and Baron Keziah are. I may try to smooth a couple of areas out before casting more of them (should when I need too.)
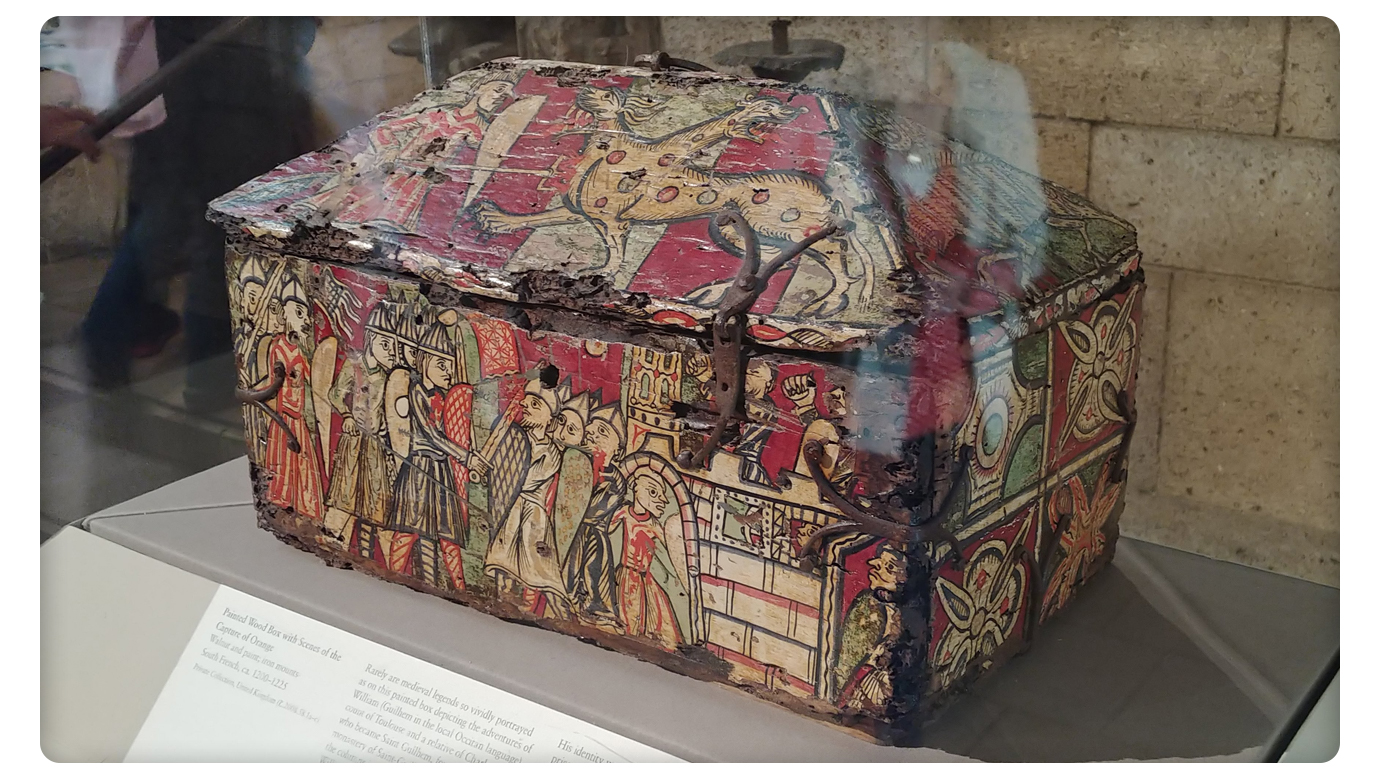
Like many good stories, this one starts at The Met Cloisters, Fort Tyron Park, New York, NY. The day following the coronation of Ozurr the Boot-Giver and Fortune Sancte Keyne, Ástríðr and I joined several others including our Baron of Stonemarche, Keziah Planchet as well as Olalla, Iddo, and Ezekiel to the fabulous Met Cloisters Museum. Among the many items of inspiration from Unicorns and Horns, to Architecture and Furniture, one item, in particular, jumped out. The simple, yet not so simple, box.
Walnut and paint; iron mounts, South French, ca. 1200-1225, Private Collection, United Kingdom (L.2008.58.1a-c) – On view at The Met Cloisters ¹
Sometimes called a cofferette, a chest, a hutch, a reliquary… it was one of these containers that Baron Keziah ² implored I make for her so that she could embellish with paint. Well, the truth was I had planned to make one anyway and despite all the teasing going on on the book of faces (#notabox), the following day, planning would begin.
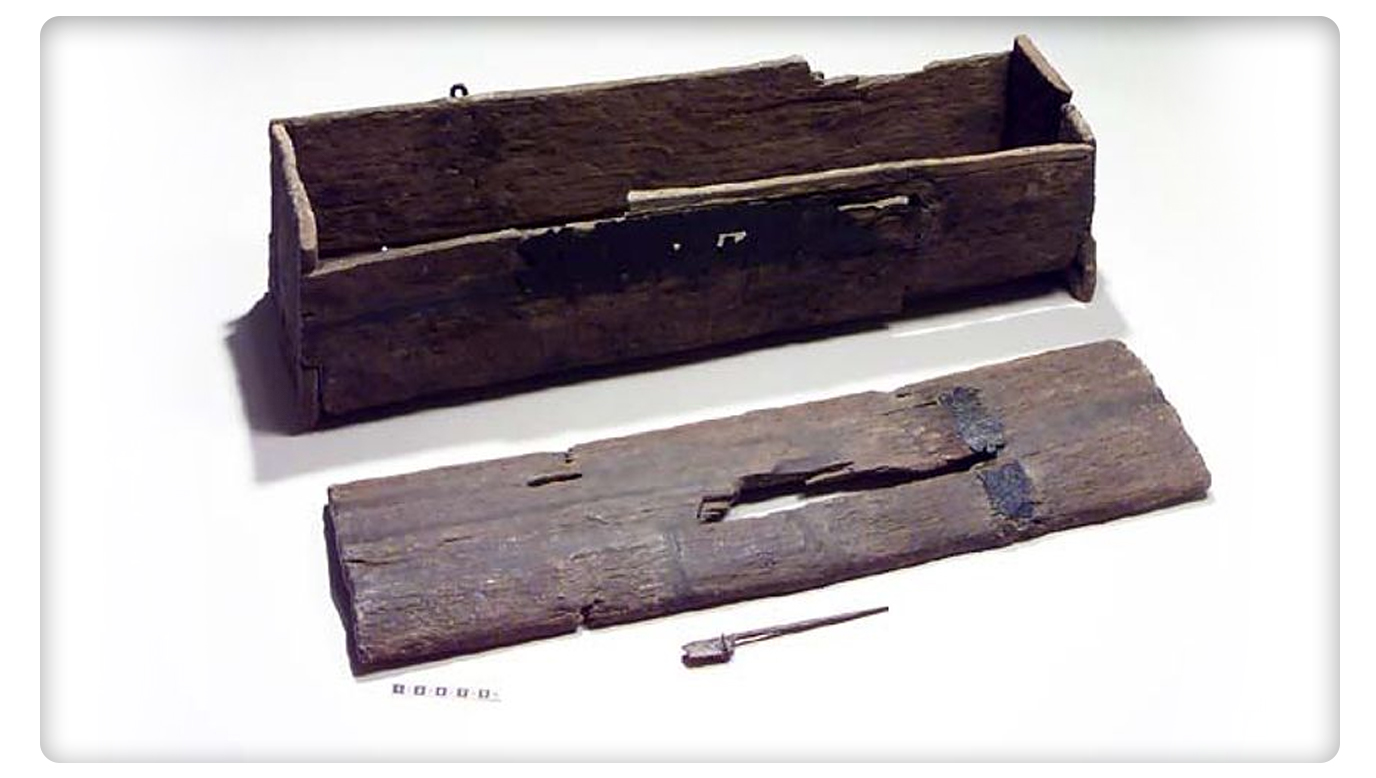
I had been researching the different types of medieval chests previously and for this first one, I would make a six board box. This style has been around for quite some time. The joinery is simple but does require nails or some sort of hardware to help hold it together. The Viking Mästermyr Tool Chest ² is a good example of the type.
The Mästermyr Tool Chest ³
The Design: As its name would suggest, the box is made of six pieces of wood; a top, bottom, left, right, front and back. Meridian School of Carpentry’s ⁴ first project just so happened to also be a box of this type. I would adapt that project slightly in size and use only hand tools to construct. A night spent watching videos about furniture design, the golden rule, Fibonacci, and tool making helped figure out the size and placement of the nails and hardware.
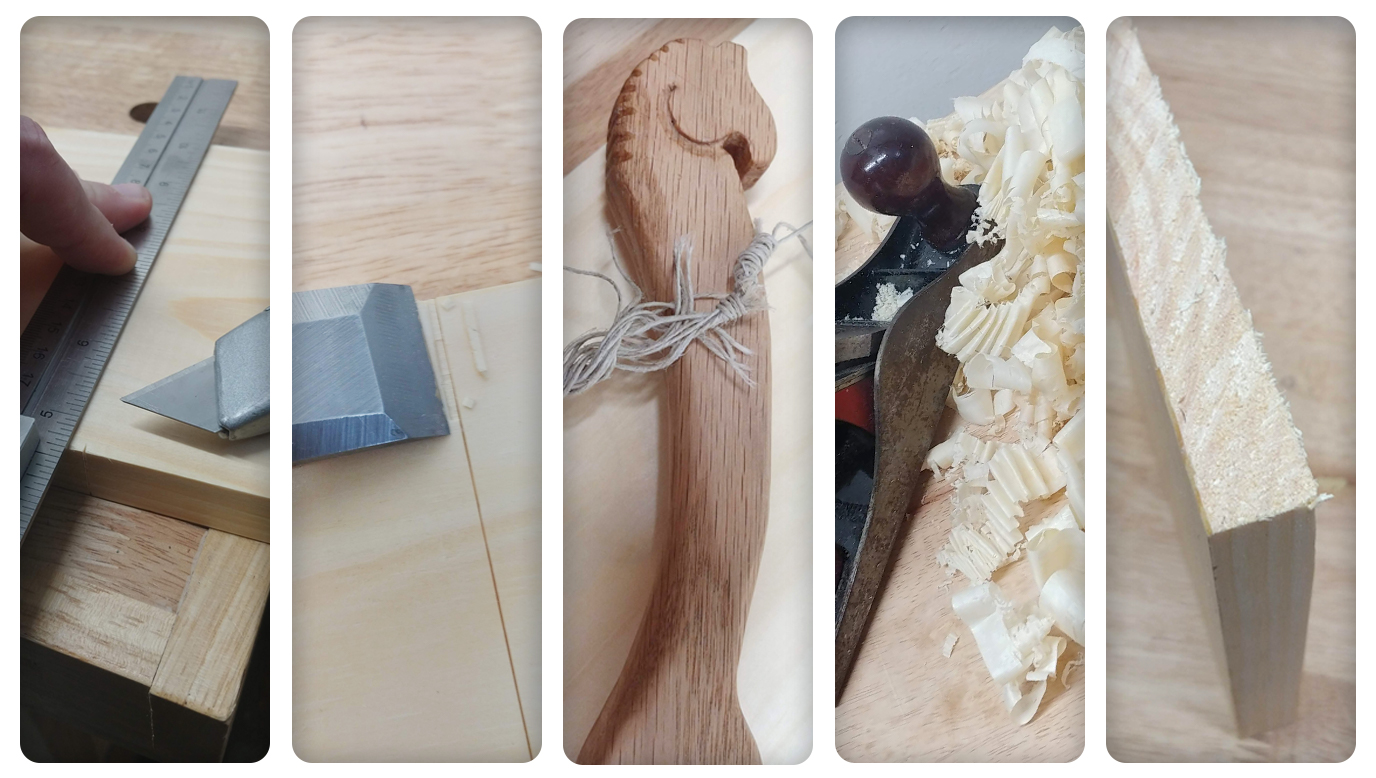
The Wood: I chose a piece of 1 x 6 ‘Select Pine’ lumber from my local big box store. I took some time to find a piece that was as free from warpage as they had. Pine was going to be easy to work with for this first project. It did chip and tear out in a few places as I expected and I will need to use a bit more care in the future. I hand cut the six pieces to length and used the hand plane to flatten things up. I was going to use the saw I had made but I may have snapped the string by over tightening it and chose a different saw.
My process for cutting involves inscribing lines with a knife and chiseling a small piece on the ‘waste’ side to help drive the saw straight.
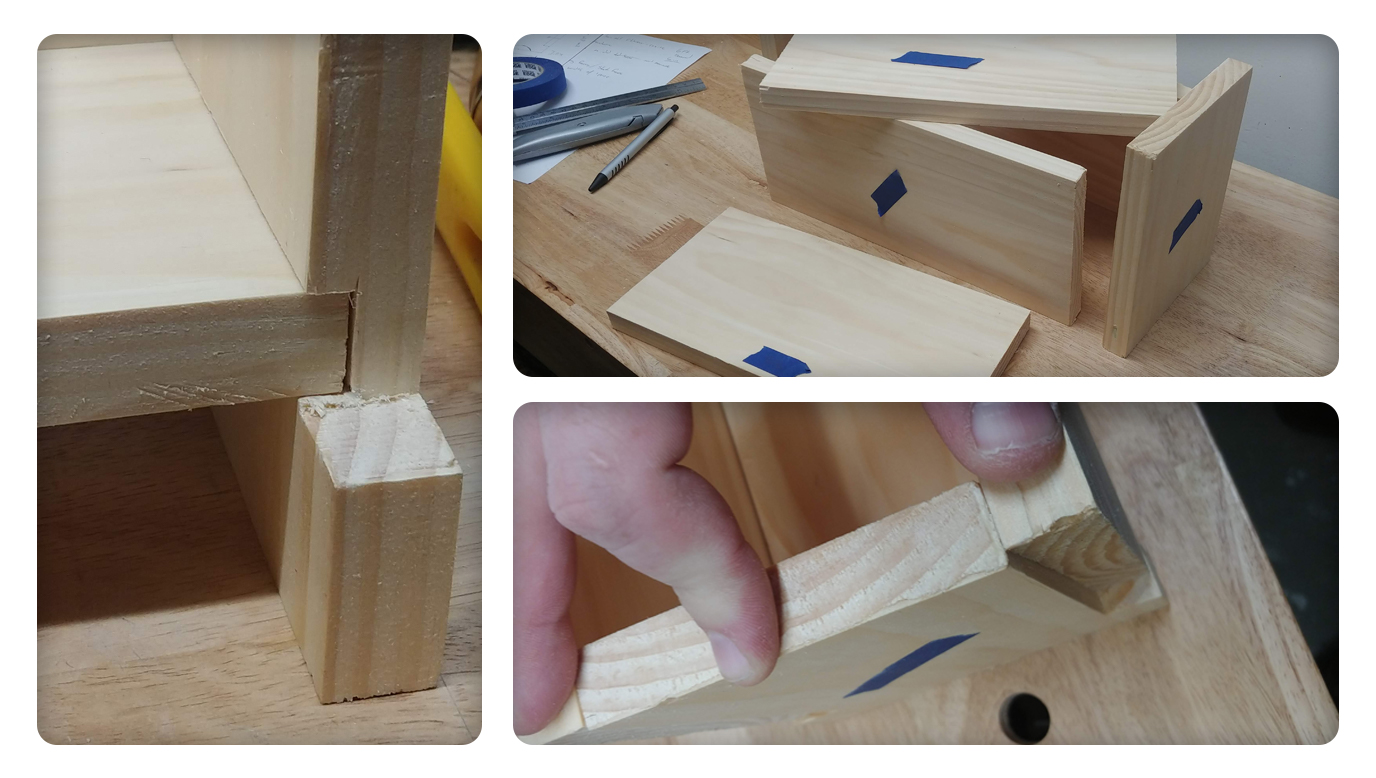
The bottom of the box had to be sawn lengthwise (ripped,) to sit within the sides. I planned to cut a dado (a slot) in the left and right pieces to hold the bottom and in hindsight, I should have done the same on the front and back. The dado was cut using a hand saw on either long side, and a chisel to break out the waste. I used blue painters tape to label each piece as I went along.
When I dry fit the pieces together I found that the front piece was shorter than the others and I ended up trimming the other three sides to bring things much closer together.
The bottom fit very well into the dado (left) It is important to mark your pieces in some way when fitting pieces together (top) especially when you find out that one of your pieces is too short (bottom).
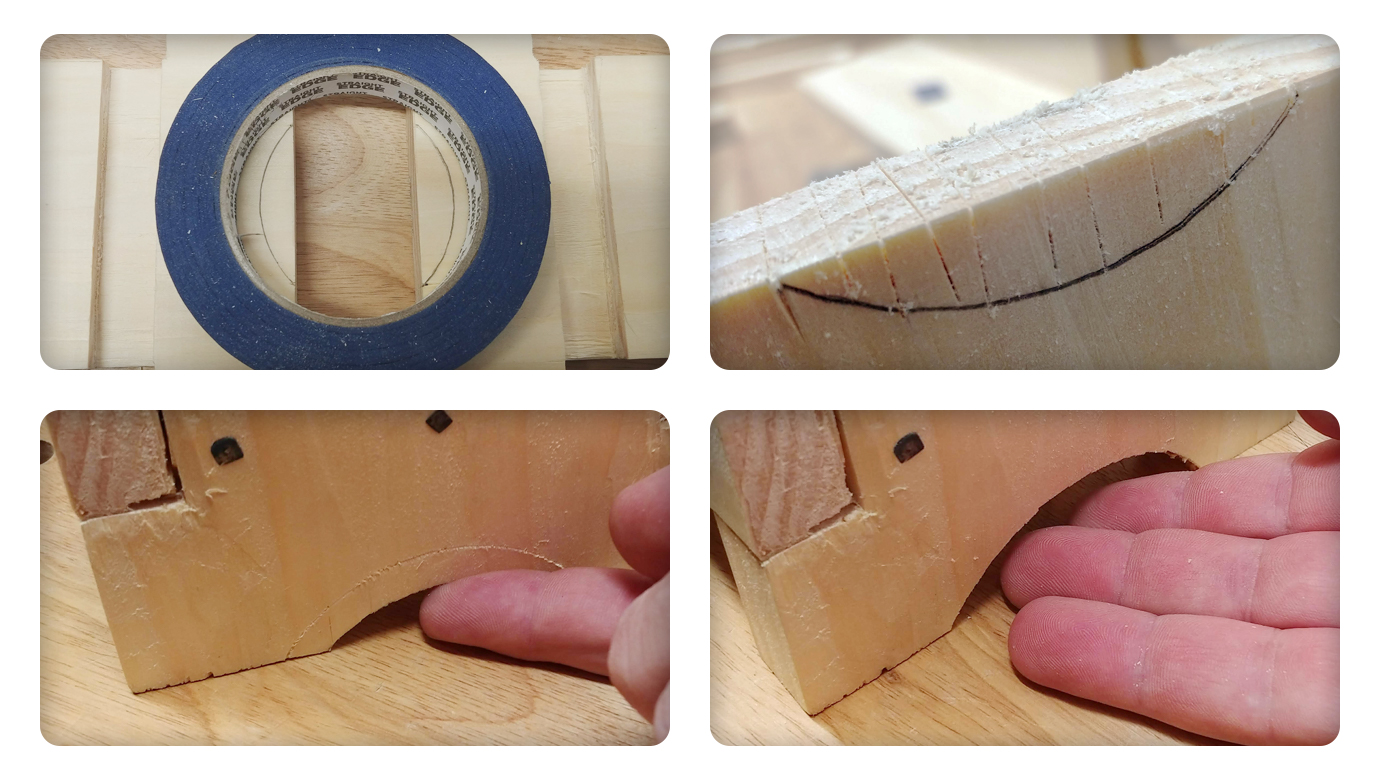
I laid out a curve on the sides to form the legs. This would help the box sit well and formed another unintended bonus. To cut these I sawed straight from the edge to the curve in several small sections and then used a sharp chisel to cut out the waste. Skipping ahead for a moment, after the box was together, I noticed that every time I would pick up the box, I found my fingers reaching under this curve to use as handles. That said, it was far too small at first so I opened each radius up to fit much better.
Top Left; Sometimes it is best to use what you have to draw a curve. Top Right; Vertical cuts will help keep the wood from breaking out when using a chisel. Bottom: Before and After creating a larger ‘hand hold’ at the legs.
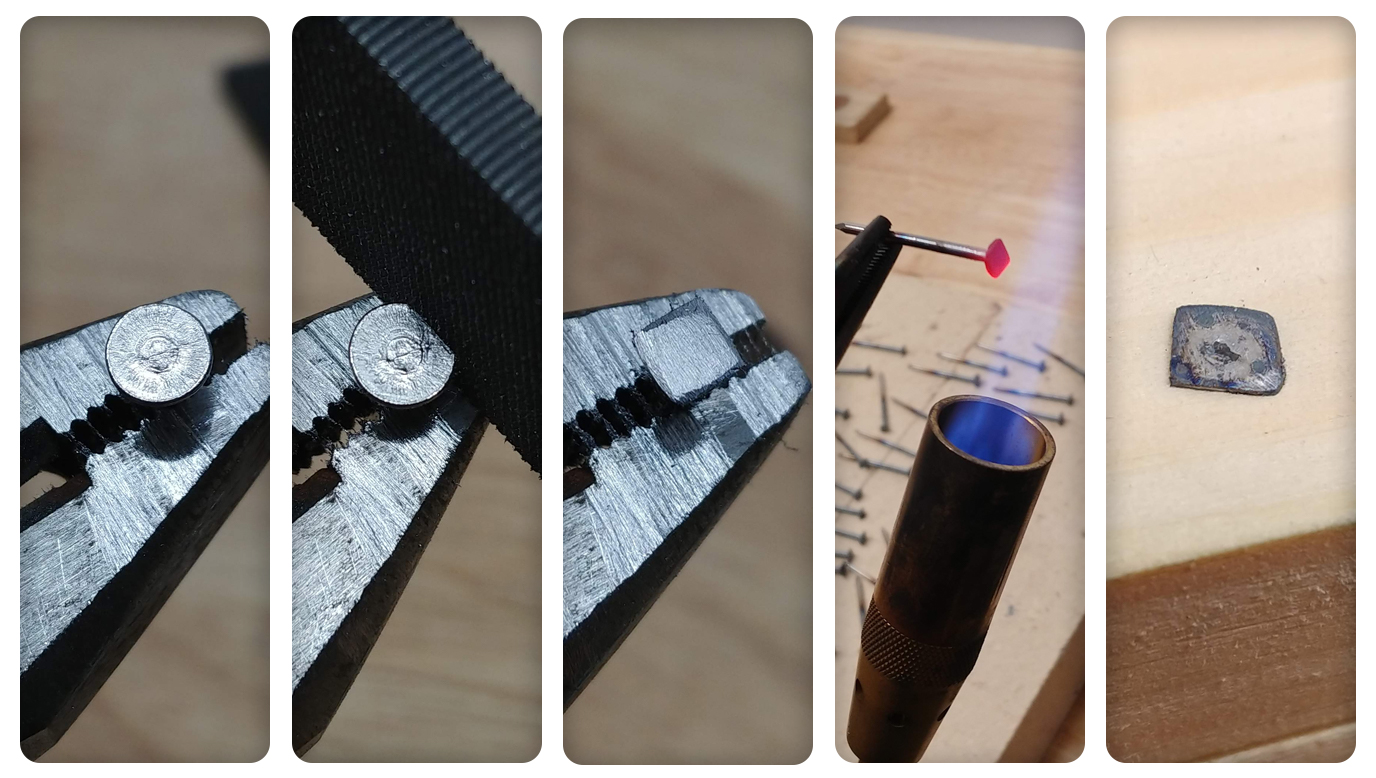
The Nails: Period nails are much different than those we have today. I didn’t have the time to find hand made nails for this project but I did modify some to ‘look the part,’ using a file and torch to square the head and blacken it up. (I have another method I am going to try soon which may produce better results and I will report back with results.) It is important to note that these are ‘steel’ nails and not ‘galvanized’ which would produce some pretty bad fumes.
Left to Right: The original steel nail, Filing the sides and top to form a square, The head after filing, Heat treatment to provide ‘color’, and The finished nail in the box.
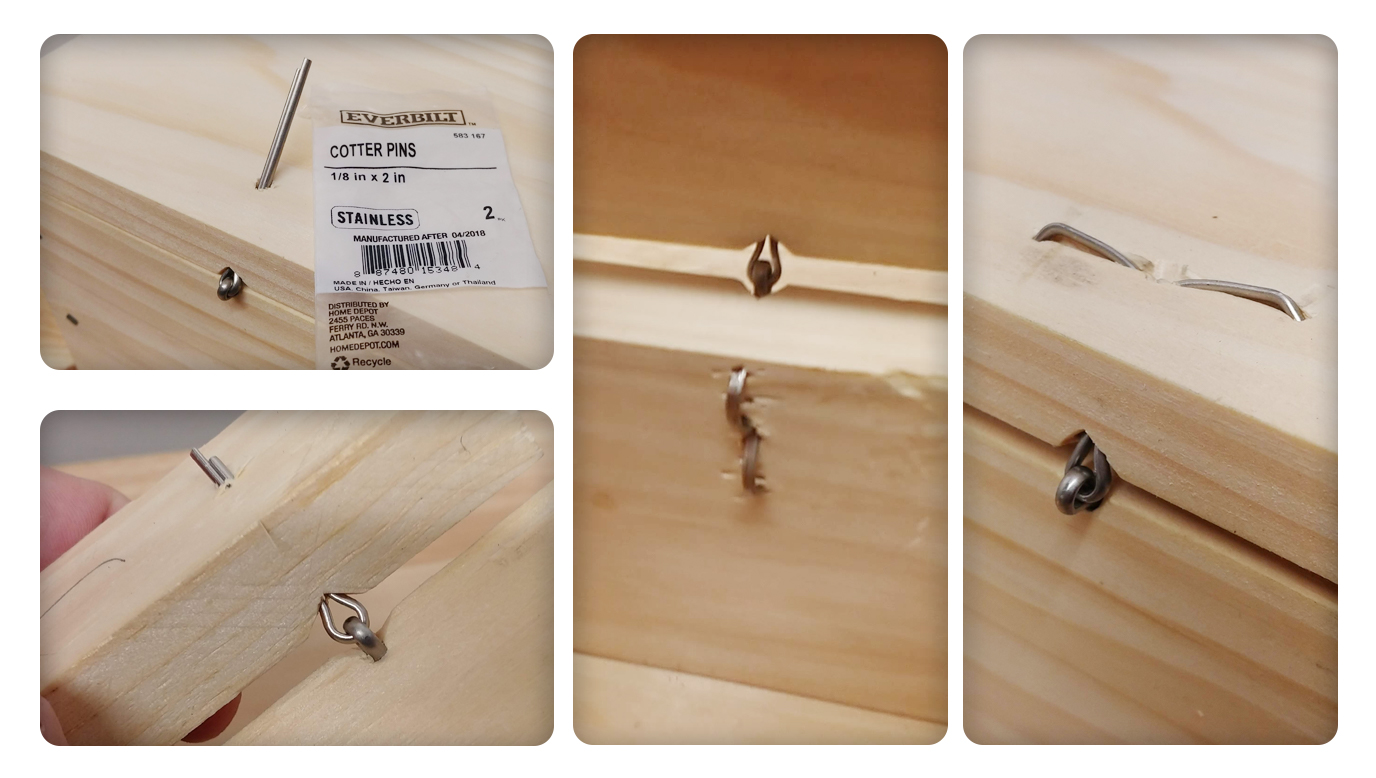
The Hardware: The Snipebill Hinge is a very period example of a simple hinge. These particular ones are made from two cotter pins attached together. The small V notch in the corner of the board is a tip to help things sit proper. That said, these were a pain to bend and bruised the soft pine in many places. The next time I will try softening the metal with a torch first, as well as installing them prior to assembly.
The latch I did purchase at the store for this project and I was unable to make corner braces in time for this project – but that isn’t to say I didn’t try a quick test.
Details of the snipe bill hinge. The lower left shows a 1 1/2 inch pin in a test piece of wood, vs the 2 inch pin used in the build. The remaining photos show the pin bent over on both the inside (center) and lid (right) in which you can see the bruising and nicking in the wood.
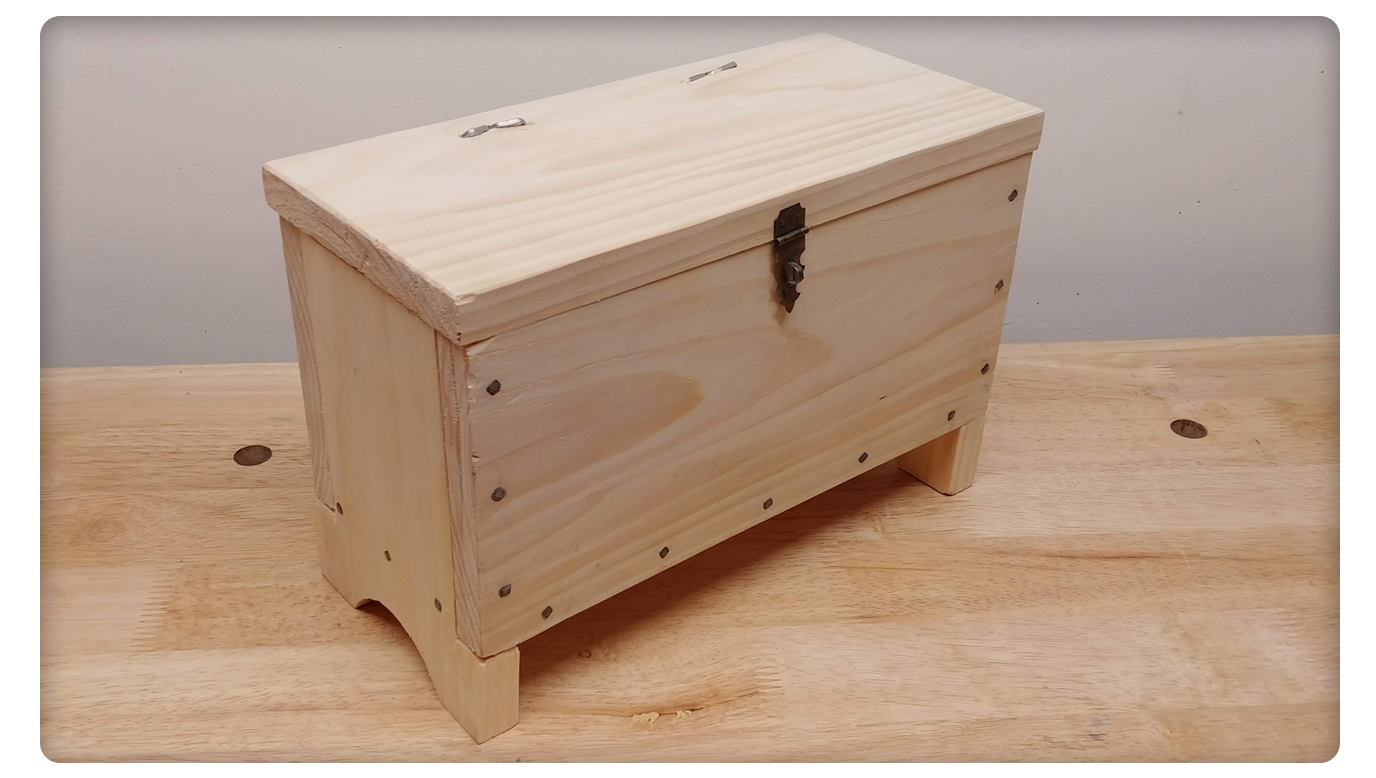
Finishing Touches: Once it was all together and looking great, I did take a sharp chisel to some edges to clean up a few places that did not line up as well as I would have liked. I hit some areas with some sandpaper and as the owner is going to paint it, I left any sort of finish off.
The Finished Cofferette – aka ‘Box’
In the end, I am very happy with the results. I need to practice cutting boards a bit straighter and planing them a bit smoother. Another trick I learned after this build is to cut the sides longer, and them trim them once they have been secured into place which I am likely to try on the next one. I was very happy to use a ruler very little and used dividers, straight edges, and marking gauges to layout the size and position of nails and hardware. I did try making a ‘layout sector’ in the middle of this project and only lost one day on that yet to be finished project but that, is for another blog post and another time.
The Met Cloisters: Read more about the Siege of Orange box on the Met website here.
“Föremål 107095. SHM 21592:132” [Object 107095. SHM 21592:132]. www.historiska.se. Swedish History Museum. Retrieved 02 May 2019.
Meridian School of Carpentry – A Facebook Group – “we are here for the weekend woodworker who has a busy life schedule, but would like to make stuff to improve their encampment”
Earlier this week, Ástriðr Sægeirrsdottir had finished warping up a new pattern on her small loom. Sadly though, she has misplaced her small shuttle. Good for her though that she has a birthday just around the corner, and I some free time.
I have a short thin length of African Padauk that I thought would make a great shuttle. I measured the width of her loom, twice as one does, and added a rather arbitrary inch to either side. I knew I’d be using a 3/4 bit to drill the holes on either side.
I laid out the position where the holes should be and began boring with an auger style bit after drilling a couple of pilot holes. The thin material was not responding well to this bit and it is probable that I need to sharpen it. It did the bulk of the job though and I would move on, using a knife to clean up the remainder. I used a small dovetail saw to cut the notches on the ends.
After a few swipes with the plane to help shape and smooth, and the knife and small chisels to chamfer the edges, I took some rough grit sandpaper to try to bevel the lead edge more. I switched to a higher grit paper to smooth further, and ‘sharpen’ the edge as I would a chisel.
The last step was to chip carve the letter ‘A’ into the side as a small personalized touch. A couple of practice pieces later, I dove into the real thing.
At the end of the day, I wrapped it, made Ástriðr tape it up herself, and then gifted it to her as an early present. I will add some sort of finish to it once she has used up all of her weft string that is already applied.
Overall I am very happy with the way it came out. I will sharpen the auger bits to see if this helps on the next piece, or if the thickness of the material really played a part.
Be sure to check out Ástriðr Sægeirrsdottir’s blog ‘The Working Needle‘ and you may see a photo of it in use eventually.
I’ve been watching and reading a lot about woodworking lately. On the big picture, My Anglo Saxon Pole Lathe project is coming along much much slower than I would like, I have a ton of research on the historical aspects and what feels like dozens of different designs. I have begun building tools… to make tools… to help me build this and many more projects to come.
My Hand Saw is coming along nicely – there is a bit of a twist which may mean I might build a second – now that I have a better understanding of the process. I am considering making a spoon bit (or two,) and I also want to create a few bench items to help hold stuff down while using a hand plane, sawing, chiseling, and more.
Frame Saw in progress
That brings me to Jennie Alexander & Peter Follansbee. Over the last few days, I have been watching a series of videos on Peter’s YouTube page. There is a six-part series from 2007 on Making a Joint Stool from a tree. It is a great look on an introduction to 17th Century Joinery. An excerpt from their book can be found at Lost Art Press here.
Near the end of the presentation, about halfway through the 6th Video, Jennie Alexander describes his inspiration. He started as a chairmaker (different than a joiner,) and as he looked at the piece of 17th-century furniture, he wanted to ‘Meet the Maker’ of it.
He wanted to meet him. I found this statement astounding and it truly captures how I feel about Anglo-Saxon woodworking right now. While I don’t have any one person I want to ‘Meet’, on the inside I have been trying to get into their heads.
As I run out of time to write today I must wrap this up. Jennie Alexander & Peter Follansbee during their talk refer a lot to reading period resources to learn who these people are. Jos. Townsend often discusses period journals and texts. I need to begin to dig deeper.
While I should really have blogged about recent events I’ve attended such as Panteria and Palio, and thanked yet again the wonderful artists responsible for certain scrolls, I’ll have to save that for down the trail.
Tonight I got a start on one of the sleeves of the blue Tunic. I don’t think I’ll get the neck embroidery done in time for GNEW but, if I can get the rest done, I can cover the neck with the hood. (Oh yeah, I finished the green hood too, see below.)
If time permits, I will add a very basic facing to avoid too much fray.
By the end of this, I may be good at the herringbone stitch but for now, some sleep.
I am working on an embroidered neckline and most likely sleeves too, for an 11th-century tunic. The base construction is done on the tunic and now to make it look good.
This slideshow requires JavaScript.
The brooch is from the Pentney Hoard and dated to between 800 and 850 AD [1]. As you can see I am mixing old and new methods of design and construction.